भाषा और सेटिंग्स
Language & Settings मेनू आपको add-on को अपने workflow के अनुसार अनुकूलित करने देता है। आप display language बदल सकते हैं, AI feature permissions manage कर सकते हैं, और अलग-अलग tools के लिए default options सेट कर सकते हैं।
Settings तक पहुँचने के लिए:
- मुख्य मेनू में
Extensions>Text To Table Converterपर जाएँ। Language and Settingsपर क्लिक करें।
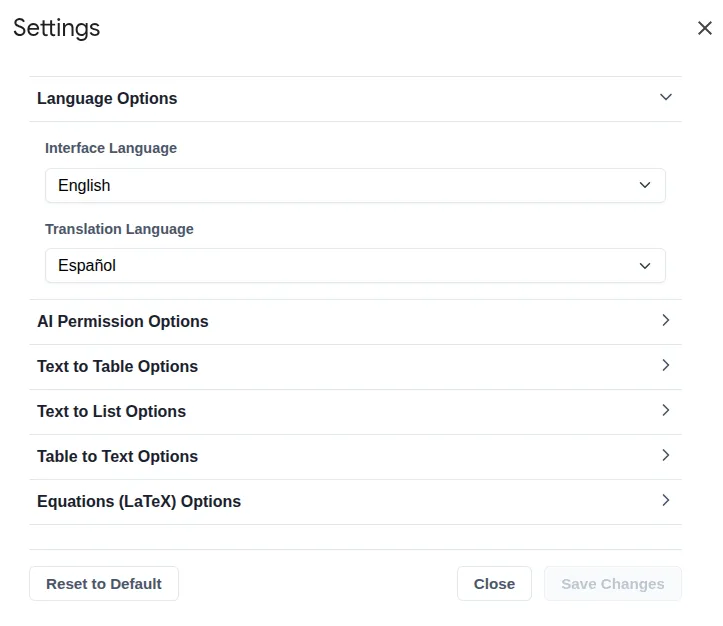
Language Options
Section titled “Language Options”Add-on के interface की भाषा नियंत्रित करें और translation feature के लिए एक default language सेट करें।
-
Interface Language: सभी add-on menus, dialogs, और sidebar की display language सेट करता है।
- Default: English
- Available Languages: English, German, Spanish, French, Ukrainian, Hindi, Traditional Chinese, Simplified Chinese, Japanese, और Afrikaans।
-
Translation Language:
Translate Selection To > Language set in Settingsmenu option के लिए default target language सेट करता है, जिससे आपकी सबसे अधिक उपयोग की जाने वाली translation language तक तेज़ पहुँच मिलती है।- Default: Spanish
- Available Languages: 50 से अधिक विकल्प।
AI Permissions
Section titled “AI Permissions”Manage करें कि add-on unstructured text को table में बदलने, summarize करने, grammar ठीक करने, और translate करने जैसी features के लिए Artificial Intelligence का उपयोग कैसे करता है।
Allow (Default): बिना confirmation माँगे सभी relevant features के लिए AI use की अपने-आप अनुमति देता है। यह default setting है।Ask: जब भी किसी feature को AI की ज़रूरत होगी, add-on pop-up confirmation dialog दिखाएगा, जिससे हर operation पर आपका नियंत्रण रहेगा।Deny: सभी AI-powered features को चलने से रोकता है। आप CSV-formatted plain text को tables में बदलने जैसी features फिर भी उपयोग कर सकते हैं।
Text to Table Options
Section titled “Text to Table Options”Configure करें कि add-on बिखरे हुए टेक्स्ट को साफ़, structured tables में बदलने के लिए AI का समझदारी से उपयोग कैसे करता है।
-
Always use AI: जब यह checked हो, तो add-on हर text-to-table conversion के लिए AI का उपयोग करता है, चाहे टेक्स्ट पहले से साफ़ structured क्यों न हो, जैसे CSV।
-
Enable AI Refinement: यह master switch दूसरी, अधिक detail वाली AI processing step को नियंत्रित करता है।
- Enabled (Slower): AI initial table structure का दूसरा pass लेकर data को reformat करती है और नीचे दिए गए options के आधार पर text सुधारती है। जटिल data के लिए यह बेहतर quality result देता है।
- Disabled (Faster): add-on text को structure करने के लिए एक single, तेज़ AI pass उपयोग करता है। यह तेज़ है, लेकिन detailed formatting options लागू नहीं करता।
-
AI Refinement Options: ये settings तभी लागू होती हैं जब
Enable AI Refinementचालू हो।- Table Orientation Preference: AI को data structure समझने में दिशा देता है।
- Date & Time Formatting: detected dates और times को consistent format में standardize करता है।
- Number Formatting: detected numbers को standardize करता है, जैसे decimal या thousands separator को consistent बनाना।
- Data Cleaning: automated cleanup rules लागू करता है:
Trim Whitespace: हर cell से leading/trailing spaces हटाता है।Remove Currency Symbols: $, €, £ आदि जैसे symbols हटाता है।Case Formatting: cells में text capitalization बदलता है।
- Correct Spelling & Grammar: AI को cell content में typos और grammatical errors ठीक करने के लिए कहता है।
Text To List Options
Section titled “Text To List Options”Fine-tune करें कि add-on text को lists में कैसे बदलता है, जिसमें visual style और AI output को कैसे refine करता है, दोनों शामिल हैं।
-
List Style: बनाई गई list के लिए bullet या numbering format तय करता है। इस dropdown में उपलब्ध options आपके उपयोग किए जा रहे app (Google Docs™, Slides™, या Sheets™) के अनुसार अपने-आप बदलते हैं।
-
AI Refinements: ये options नियंत्रित करते हैं कि AI आपकी lists की content और structure को कैसे बेहतर बनाए। ये settings तभी लागू होती हैं जब conversion के लिए add-on AI का उपयोग करता है (या तो messy text के लिए, या जब ‘Always use AI’ enabled हो)।
- Always use AI: जब checked हो, तो add-on हर text-to-list conversion के लिए AI का उपयोग करता है, यहाँ तक कि simple text के लिए भी जो पहले से line breaks से अलग हो। इससे AI refinements हमेशा लागू होते हैं।
- Correct Spelling & Grammar: जब checked हो, तो AI generated list items में मिलने वाली spelling और grammar mistakes अपने-आप ठीक करती है।
- Make list items grammatically parallel: जब checked हो, तो AI list items को एक समान grammatical structure में rephrase करती है (जैसे हर item verb से शुरू हो)। इससे lists अधिक professional और readable बनती हैं।
Table To Text Options
Section titled “Table To Text Options”जब आप किसी table को फिर से plain text में बदलते हैं, तब output format configure करें।
- Table To Text Delimiter:
🔡 ➜ 🔤 Selected Table to Textfeature का उपयोग करते समय हर row में cell data को अलग करने वाला character तय करता है। यह दूसरे applications में उपयोग के लिए CSV-जैसा data बनाने में उपयोगी है।- Available Delimiters: Comma, Tab, Semicolon, Pipe, और अन्य कई विकल्प।
LaTeX Equation Options
Section titled “LaTeX Equation Options”Equation tools के default behavior और appearance को अनुकूलित करें।
-
Block Delimiter: वे characters जो “display” या block-level equation को wrap करते हैं।
- Other Option:
\[...\]
- Other Option:
-
Inline Delimiter: वे characters जो आपके text के साथ flow करने वाली inline equation को wrap करते हैं।
- Other Option:
\(...\)
- Other Option:
-
Block Equation Height (pt): block-level (centered) equation images के लिए default height points में सेट करता है।
-
Inline Equation Height (pt): inline (in-text) equation images के लिए default height points में सेट करता है।
-
Insert as Multi-line Code: जब checked हो, तो बेहतर readability के लिए LaTeX source code को कई lines में formatted रूप में insert करता है।
-
Format block equations using a table layout: जब checked हो, तो block equations को borderless two-column table के अंदर रखा जाता है। इससे equation numbers को साफ़ right-align किया जा सकता है। जब unchecked हो, तो equations simple centered paragraphs की तरह insert होती हैं।
-
Show number on new block equations: जब checked हो, तो नई block equations में अपने-आप sequential number जोड़ता है। (इसके लिए table layout enabled होना चाहिए)।
-
Numbering Alignment: equation number को equation के left या right align करता है। (इसके लिए numbering enabled होना चाहिए)।
-
Equation Number Format: equation number को घेरने वाले characters तय करता है।
-
Add bookmark for cross-referencing: जब checked हो, तो equation number में Google Docs bookmark जोड़ता है, जिससे आप document के अंदर उस equation का link बना सकते हैं। (इसके लिए numbering enabled होना चाहिए)।
Reset Settings
Section titled “Reset Settings”
अगर आप सभी options को उनकी मूल factory state में वापस लाना चाहते हैं, तो settings dialog के नीचे Reset to Default button पर क्लिक करें।